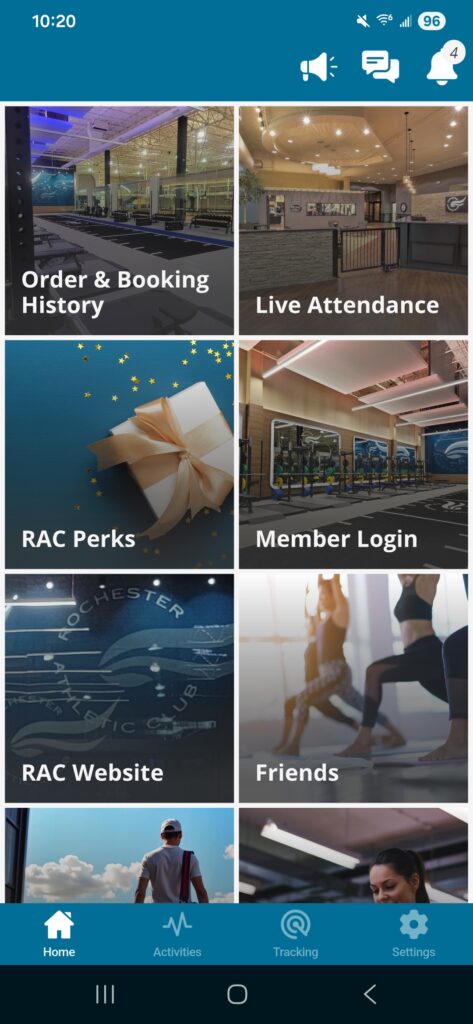
With the RAC app on your phone you can sign up for Group Fitness classes (“Reservations” tile), access our website, or check on how active the club is (“Current Usage” tile). The app also provides a whole lot more including being a one spot stop for launching and signing into the EGYM app, EatLove app, your club account (“Member Login” tile), and the RAC Perks website.
Getting Started with the RAC App
New Members: During their joining appointment with Member Services, new members will receive an email that invites them to set up their RAC app account and to download the free RAC app. To be invited, you must be over 13 and you must provide a unique email address.
Current Members: If you are a current member and you would like to receive an invitation to get started, email the RAC App Administrator. Please provide first name, last name, and a unique email address for each person on your membership account for which you would like us to create a RAC app account.
The RAC App Home Screen Tiles
Reservations
Display today’s Live Group Fitness Class Schedule or the EGYM Onboarding sign up schedule by selecting the desired "Schedule" and then selecting "Show Results".
Learn more
Reservations
Most Live Group Fitness Schedule classes are included with your membership. Classes which have a fee will be marked clearly in the app.
EGYM Onboarding sessions can be reserved up to a week in advance.
EGYM Fit for Life
After you have attended your EGYM onboarding appointment you can sign in through this tile to access your EGYM account.
Learn more
EGYM Fit for Life
To learn more about EGYM and how to set up an onboarding appointment please see our EGYM webpage.
NOTE: Please do not set up your EGYM account before your onboarding appointment.
Member Login
Log in here to see your account info, buy packages, sign up for classes, set up lessons and trainings, reserve courts and more online. Learn here about Empower M.E. and how to set up your account.
Learn more
Member Login
You can learn more about setting up your member login for your club account by taking this link to the Create a Member Login webpage.
RAC Website
If you are reading this, you are already finding club information on the website. Now with your RAC app, you have a quick link to website information whenever you want it.
Learn more
RAC Website
The RAC Website is a great information source to help you get the most out of your membership! Keep up to date on the club by scrolling down on the website home page to find the News, Blog, and Facebook section. Select from the top of page navigation categories to learn more about the club and what it has to offer.
EatLove – Nutrition
EatLove is our new nutrition app and will fit you with a personalized nutrition plan for your unique goals and lifestyle. It also provides smart meal recommendations, recipes and more to support healthy nutrition.
Learn more
EatLove – Nutrition
To learn more about what EatLove can offer please check out the EatLove webpage.
Current Usage
This tile will bring up the club's "Current Usage" meter which shows how full the club is in real time. The meter is also found at the top of each webpage on this website by selecting "Live Attendance".
Learn more
Current Usage
As people enter and leave through the gates of the club there are sensors which detect the movements. Using this data we can determine real time data for the club’s usage at any given time.
RAC Perks
You can view RAC Perks point “Earning Activities” and the “Perks” available. If you have a RAC Perks account set up, you can view your account balance and redeem perks. Learn here how to get started if you have not set up your account.
Learn more
RAC Perks
The RAC Perks program rewards members for using the Rochester Athletic Club and its services.
If you have not set up a RAC Perks account, please go to the RAC Perks webpage for directions on “Getting Started with RAC Perks”.
To sign in and use your RAC Perks account:
Select the RAC Perks tile on your home screen.
Select the “3 stacked lines” icon in the top right of your screen.
Select “Sign In” and use your RAC Perks sign in information.
You now can see your “Points” balance and recent activity.
You can also select “Earning” to see how you can earn points, or select “Perks” to view and redeem perks. See the full “Redeeming Earned Points for Perks” process (which involves picking up a paper certificate at the Front Desk) on the RAC Perks webpage.
Preva (app)
If you have a Preva account set up for tracking your workouts on the Precor cardio machines on the Fitness Floor, you can also sign into that account through the Preva app. Learn here how to set up the app.
Learn more
Preva (app)
Members who like to track their workouts with the Preva system now can get easy access to the Preva app through the RAC app. With the Preva app you can access your Preva account even when you are away from the club.
Many members use their Electronic Id to sign into the Preva system automatically. If you have forgotten your sign in or have questions about the Preva system, you can ask Fitness Staff or email Fitness Director Steve Boring or call him at (507) 287-9312.
Note: The information in the Preva system currently cannot be imported automatically into RAC app totals. It is a separate system.
IPHONE AND IPAD SET UP:
When you select the Preva tile it will take you to the App Store where you can download the Preva app by selecting the “cloud” icon.
Once it is installed, select “OPEN” to open the app.
If you know your sign on from using Preva on the Fitness Floor you can sign in here. If you do not have an existing account you can select to “Create Account”.
If it asks for a club code enter “PREVA”
ANDROID PHONE AND TABLET SET UP:
When you select the Preva tile it will take you to the Google Play store where you can download the Preva app by selecting “INSTALL”.
It will ask for access to a few things. Select “ACCEPT”.
Once it is installed, select “OPEN” to open the app.
If you know your sign on from using Preva on the Fitness Floor you can sign in here. If you do not have an existing account you can select to “Create Account”.
If it asks for a club code enter “PREVA”
Fitness Trackers
You can set up your fitness tracking device that uses Apple Health or Google Fit to input information into the RAC app. You can also connect to your Fitbit. Learn here how to set up your device.
Learn more
Fitness Trackers
IPHONE DIRECTIONS:
The RAC app can connect with your Apple Health device to automatically bring information into the RAC app.
Very simple to set up, just select the Fitness Tracker tile and then select to “Allow”.
Apple Health is not supported on iPads.
ANDROID TABLET AND PHONE DIRECTIONS:
The RAC app can connect with your Google Fit device to automatically bring information into the app.
Not currently working for android devices. RAC app developers are looking into a fix.
FITBIT DIRECTIONS:
You can only connect your Fitbit to the RAC App by going through the RAC app website. Once connected it will automatically feed information into the RAC app.
Login with your RAC app sign on (email and password) if you are not already signed in.
In the top black bar select the “person” icon on the right to get a drop down list.
Select “Account Settings” from the drop down list.
Select “Connections” in the left hand column.
Select to “Connect” to your Fitbit account. Once you sign in to your Fitbit account it will ask for permissions and then if you allow permissions your account will be connected.
Challenges
Challenges can help you focus on reaching your goals, sometimes with the additional benefit of gaining prizes! Learn here how to participate in club challenges or set up your own personal challenge.
Learn more
Challenges
Selecting the Challenges tile takes you to a screen where you initially see Club Challenges.If there are challenges active they will appear without searching.
To view a challenge:
Select the challenge. You are taken to a screen where you are initially shown the “Information” tab. You can also select the “Leaderboard” tab to see how others who are currently participating are doing.
Once you have joined a challenge, there will be a third “Activity” tab added which shows the recent activities of those participating in any of the challenges. This will now be the first tab you see when you get to this screen.
To join a challenge and make entries:
Select to join challenge.
There are different types of challenges. Some may require you to track a measurement, while some may require you to use your Activity Calendar to track your workouts.
If you join a measurement challenge (for example Steps or Weight Loss) and you are not already tracking the measurement, you may be asked to first enter an initial value for a measurement before you can join. This is done through the Progress tile. Enter your measurement and then return to the Challenges tile again to join. During the course of this type of challenge, you will make all measurement entries through the Progress tile.
To leave a challenge:
If you want to stop participating in a challenge select the “3 dots” icon in the upper right corner of your screen.
Select “Leave challenge”.
PERSONAL CHALLENGES:
You can create your own Personal Challenges through the RAC app website:
Sign in using your RAC app login.
Select “Challenges” tab.
Select “Add Challenge”.
Select the Challenge Type from one of the options offered.
Follow through the screens to create your challenge.
Once you have created a challenge you cannot edit it.
The challenge will now show up if you select the Challenges tile.
NOTE: Your check-ins to the club do not get loaded into this app. So, although you can create a challenge for “Amount of check-ins”, it will not be measured automatically in the app unless you are completing activities.
You can only delete a Personal Challenge through the RAC app website:
Sign in using your RAC app login.
Select “Challenges” tab.
Select your challenge.
Select the “garbage can” icon in the upper right of the screen to delete it.
Workouts
This is a great tool to help plan and check off your workouts. Watch animations to remind you of exercises and proper form or read exercise notes left by you or your trainer. Learn here how to use this powerful feature.
Learn more
Workouts
The best way to use this section is to bring these directions up on a desktop computer and then read the directions and walk through the steps with your phone or tablet.
There are four main headings:
Workout Basics
Creating Your Own Workout
Editing a Workout
Using a Workout That Has Been Scheduled
NOTE: You can jump to the “Using a Workout That Has Been Scheduled” heading if your workout has already been scheduled on your Activity Calendar by your trainer.
WORKOUT BASICS:
When you select the Workouts tile you will see the Workouts screen. On this screen you will be shown workouts “Created By Me” in the top section (initially there will be no workouts), and then in the following sections you will see workouts in categories like “Gain Muscle”, “Improve Well-being” and “Lose Weight”.
The workouts initially shown have been set up as sample workouts that all club members can access.
You can swipe to the left to view more workouts or select “Show All” for each category to get a vertical list.
You can also choose the “magnifying glass” icon to search for workouts and it will take you to a screen where you can filter all the workouts by Goal, Level, or Equipment.
Note that the sample workouts may not be appropriate for all members. Please contact Fitness Floor staff with any questions.
Select a workout from the list to view a workout screen. You will see information about the workout including the list of activities starting at the bottom of your screen.
Click on an activity in the list to go to an individual activity screen. This screen shows:
An animation of the activity.
A circled “i” icon at the top right of the screen that you can select to see instructions.
Tabs you can select for more information near the top of your screen: You are on initially on the Exercise tab and you can also select your Statistics (initially blank) and Muscles worked.
Select the left arrow in the upper left corner of your screen to return to the workout screen.
To schedule a workout:
On the workout screen:
On iPhone or iPad you can select to “Plan this workout”.
On Android devices you can select the “calendar” icon in the bottom right of your screen.
Both options allow you to schedule the current workout you are viewing onto your activity calendar.
After selecting, you will be given options to do it once or repeat.
Once will schedule it for today on your calendar.
Repeat will take you to another screen where you can select the start date, the number of weeks you want it to run, the end date and what days of the week you would like it planned for. (Note: some workouts are set up to be done over multiple days of the week – the number of days will be listed under the title of the workout on the workouts screen.)
Select “Plan this workout” or “OK” depending on what option your device offers. Your workout has now been placed onto your activity calendar.
You can find the workout on your schedule and set weight amounts and other time or repetition measurements by accessing it through the My Activity Calendar tile. See the “Using a Workout That Has Been Scheduled” section below to learn more.
CREATING YOUR OWN WORKOUT:
When you select the Workouts tile you will see the Workouts screen. If you look at the “Created By Me” section at the top of the screen, you will see any workouts that you have created or that staff has created specifically for you (note that if you are a brand new user there may not be any created yet).
To create a new workout from scratch:
On the workouts screen, you will see an option “+ Create Workout”. Select this option and it will bring you to the edit workout screen.
Now you can edit the workout and fill in the new workout information. Go to the “Editing a Workout” section below to learn more.
When you have finished editing it, the workout can be found on the workouts screen under the “Created By Me” section. It will also be found under the corresponding goal section (for example if the goal of the workout was to “Gain Muscle” it would be found under that section on the workouts screen).
To update an existing custom workout:
On the workouts screen, Select the workout you wish to edit. The individual workout screen will display.
Select the “pencil” icon at the top of the screen and it will bring you to the edit workout screen.
Now you can edit the workout. Go to the “Editing a Workout” section below to learn more.
To create a workout based on an existing workout:
For iPhone or Ipad:
You can only copy the initial sample workouts (workouts you haven’t created) on iPhone and iPad devices.
On the workouts screen, Select the sample workout you wish to base your new workout on. An individual workout screen will display for your new copy.
You can edit this copy by selecting the “pencil” icon.
Select “Create Copy”. This will bring you to the edit workout screen.
Now you can edit the workout. Go to the “Editing a Workout” section below to learn more. It is best to rename this new workout at least slightly so that you will not end up with several workouts with the same name.
When you have finished editing it, the workout can be found on the workouts screen under the “Created By Me” section. It will also be found under the corresponding goal section (for example if the goal of the workout was to “Gain Muscle” it would be found under that section on the workouts screen).
For Android Devices:
On Android Devices you can copy any workout.
On the workouts screen, Select the workout you wish to base your new workout on. An individual workout screen will display.
Select the “3 dots” icon at the top of the screen and select “Copy”. It will create a copy.
You can choose to edit this copy by selecting the “pencil” icon. This will bring you to the edit workout screen.
Now you can edit the workout. Go to the “Editing a Workout” section below to learn more. It is best to rename this new workout at least slightly so that you will not end up with several workouts with the same name.
When you have finished editing it, the workout will be found on the workouts screen under the “Created By Me” section. It will also be found under the corresponding goal section (for example if the goal of the workout was to “Gain Muscle” it would be found under that section on the workouts screen).
To delete a workout:
Note: You cannot delete the original sample workouts.
On the workouts screen select the workout you wish delete.
On the workout screen select the “pencil” icon to edit and then scroll to the bottom on the new screen and select delete. On an Android device you can also simply select the “three dots” icon and select “Delete”.
EDITING A WORKOUT:
Whether you have gotten to this point by creating a new workout or by copying an existing workout (see directions above), the edit workout screen allows you set up your new workout. Many parts you can figure out on your own, but here are a few tips:
To add an activity to your workout (tips):
Near the bottom of the edit workoutscreen (you may need to scroll down) there is an option to add an activity to your workout. When selected this option will take you a screen where you can search for and select your activity to add. Since there are thousands of activities, it will be likely that you will need to filter and search to find an exercise you want to add.
You can filter by Muscle Groups or Equipment by selecting the drop downs near the top of your screen.
You can search using the “magnifying glass” icon. When searching it searches for letters, wherever they are in the word, so for example “run” would also pop up options for “crunches”. (Note: If you cannot find your activity, please contact the Fitness Staff or Fitness Director for assistance.)
Once you have found your activity you can specify your goal sets and repetitions for it by selecting on the numbers (Ex. “15x”). Weight settings are not added until after it has been scheduled on your activity calendar.
You can also leave yourself a note about the activity if you want by clicking on the “paper” icon, entering your note and on iPhone or iPad hit the top left return arrow or on Android devices select “ADD TO MY WORKOUT”.
To edit the list of activities in your workout (tips):
On the edit workout screen:
There is quite a bit of function that only becomes visible if you check the box to the right of an activity in a workout list. Once you have checked a box, more options will come into view at the very top of your screen.
If you select two or more boxes, then an additional option to link multiple activities together will appear. This will allow you to move these activities together as one chunk in your list, or to copy or move the chunk to a different day.
You can also easily move an individual activity within a list by long pressing on the name.
Extra function that becomes visible if you check boxes on the activity list:
Move (activity to a different day)
Copy (activity to a different day)
Delete (checked activities)
Link (checked activities)
All (check all activities)
None (uncheck all activities)
USING A WORKOUT THAT HAS BEEN SCHEDULED:
To view a workout on your activity calendar:
Select the My Activity Calendar tile. This will show you the current month. Swipe to move to the previous or next month.
Select on a date a workout has been scheduled on. You would see the activities and workouts planned for that day. If you swipe left or right you can go to the previous or next day.
To make entries for individual activities in your workout:
Once you have brought up a day with a workout on it and selected an activity on the list, you are on the individual activity screen and you can:
Enter values for weights or to adjust the number of sets or repetitions by pressing on the numbers for reps (for example “15x”). Different activities will show different measurements at the bottom of this screen and you can select them and then adjust values to what you are planning to do, or what you actually accomplished today if you are currently doing the workout.
Leave a note about the activity by selecting the “paper” icon.
View your statistics for the activity, or view the muscles worked by selecting the tabs at the top of the screen.
See instructions for the activity by selecting the circled “i” icon at the top of the screen.
Play an animation of the activity by clicking on the “play” icon in the center of your screen.
To check off your workout as you do it:
If checked as completed, an activity will be counted toward your RAC app activity totals. There are “small green check mark” icons by the left side picture to indicate that an activity has been completed.
You can check off an activity by clicking on the picture to the left of the activity. Note that you cannot check off future date activities.
If you scheduled your workout or activity today, the activities will be checked off already when you view today’s workout activity list on your calendar. If you want to uncheck them all, just select an activity by checking the box to the right of the activity. This brings up more options at the very top of the screen. Select the “three dots” icon and then select “All”. Then select the “fading check mark” icon at the top of your screen to uncheck and remove all the green checks from the list.
To adjust your workout as you do it:
To add to your workout: The “plus” icon on your screen allows you to add an activity (Ex: let’s say you warmed up by walking a quarter mile), or even add a whole additional workout (Ex: I had time so I worked legs today, too).
To delete an activity: Check the box to the right of the activity and then choose the “garbage can” icon at the top of the screen.
To move an individual activity to a different day:
Check the box to the right of it.
Select the “Move” icon. It will bring up a calendar and you can select the date to move the activity to.
To move a group of activities to a different day:
You can link activities together by checking the boxes on the right.
Select the “link” icon which appears at the top of your screen.
Select the box to the right for the linked activities.
Select the “Move” icon. It will bring up a calendar and you can place the activities on the date you plan to do them.
Progress
Chart and view your progress in areas important to you. What gets measured gets done. Learn how to unlock the power of progress tracking.
Learn more
Progress
Selecting the Progress tile takes you to a screen where you can enter values for a measurement and then view your progress over time. These measurements can include more than just inches or pounds. There are options like healthy habits (sleep, stretching, eating fruit), your max for an exercise, or even health measurements like your cholesterol.
If you have not been tracking and entering values in the past this screen will initially look blank. There are three tabs you can select on this screen. The information you see first is from the Graph tab.
The Graph tab:
Shows a graph of the information for one measurement (if you have entered values). There will always be light blue words near the top of the screen which indicate what is currently being displayed to track.
The List tab:
Shows you a list of the entries you have made over time for the measurement selected.
The Body Composition tab:
Allows you to track up to 5 Body Composition measurements. If you have entered values then the circular chart will update to represent the most recent percentages of each.
To set up what you would like to track:
Select the Graph Tab.
Select the light blue words at the top to display preset options of what you can track.
Either select one of the options set up for you or select “More” if you would like to see other options.
On Android devices: To add to your preset options, check the box to the right of the new measurement and then select the check mark at the top of the screen.
On iPhone and iPad: To add to your preset options, select a new measurement and it will be added automatically.
Select a measurement from your list that you want to start tracking.
If you want to enter a value for today, select the “+” button at the bottom of the screen and enter the new value.
You can also track other measurements (there are hundreds of options) by repeating the process of selecting the light blue words at the top and then selecting your new measurement.
Tunity
Download this app in order to listen to cable channels through your mobile phone (with headphones). Great for using with the large TVs on the Fitness Floor.
Learn more
Tunity
Please only use with headphones on the Fitness Floor.
Download this app to allow you to listen to the sound for a cable TV station. To set up for use:
Select the Tunity tile on your phone or device.
Select to Install.
Select to Open.
Select to “Try Now” or “Sign Up” (for a free Tunity account).
Read through the brief description screens.
Allow the app to use your camera and location.
Place the TV picture within the target square when you are preparing to scan.
Press the Tunity logo button to scan.
When it has completed the scan and finished the set up, you should begin to hear the sound through your headphones.
Become PRO
This tile in the app notifies us to activate a PRO account subscription. For a small monthly fee you gain access to exclusive features and content like streaming video classes and audio meditations. You also get access to PRO groups and challenges and access to 100+ workout plans.
Learn more
Become PRO
Start your journey to better physical and mental health! With a PRO account subscription, you get access to:
Over 600 streaming video classes
Audio Meditations
Access to PRO group challenges
Access to 100+ workout plans
Members: $4.99 per month
Non-Members: $9.99 per month
Members can sign up for PRO access simply by selecting this tile on your RAC app. When the request is processed by our staff you will see an additional two tiles appear on your app home page: “Meditation” and “Video On Demand”. You also will see access within the app for the additional areas like groups, workouts, and challenges.
If you are not a member, please contact Fitness Director Steve Boring for help in getting set up with both the RAC app and PRO access.
Your Personal Dashboard
The bottom tray of icons on your RAC app home screen allow you to communicate with club groups and friends and also provide a quick place to keep tabs on your plan and current status:
The Calendar icon allows you to view your goals and make your plan.
The Explore icon helps you to find classes, workouts, activities, and challenges.
The Community icon allows you to communicate with groups and other members. Learn more under the Community FAQ below.
The Me icon allows you to see some basic information about your profile and also shows regular (non-holiday) club hours. You can adjust your settings by selecting the settings icon at the top of the screen. Learn more under the Settings FAQ below.
RAC App FAQs
Community – How do I see what groups are available, join groups, post to groups, send messages to friends or see my stream?
When you select the “Community” icon in the bottom dashboard tray of icons you will see the Community screen. It has three main sections. The top section is Groups, the middle section is “Write a post”, and the bottom section is your Stream.
GROUPS:
At the top of the Community screen you will see the groups that you are currently in. The RAC Club Notifications group is a special group that every member is initially in. It is used to communicate important information about the club (for example a weather closing or late start).
To join a group:
Select “Explore Groups”.
Select a new group from the list. You will then see a description telling you the purpose of the group and you may see group postings as well.
Some groups may allow you to select to Join Group and you are automatically added.
Other groups may ask that you select to Ask Permission to Join. In this case a group leader must still see and accept your request before you are added to the group.
Once you have joined a group you may be able to post, comment on a post, or not post at all depending on how the group is set up to work.
To post to a group:
For iPhone and iPad:
Select a group you are in from the list.
If postings to the group are allowed you will see a “pencil” icon you can select.
You can then type your post and even attach a photo.
To send the post select the “check mark” icon.
For Android devices:
Select a group you are in from the list.
If postings to the group are allowed you will see a “message balloon” icon that you can select.
You can then type your post and even attach a photo.
To send the select the “arrowhead” icon.
To leave a group (completely quit a group you are in):
Select the group.
Select the “three dots” icon at the top right of the screen.
Select the option to “Leave group”.
FRIENDS & FOLLOWING:
To find your friends:
On the Community screen select the search “magnifying glass” icon in the upper right corner of your screen.
You are now on the member Search screen. For Android devices you will need to select the search “magnifying glass” icon in the bottom right corner of your screen.
Type in the display name of the friend you want to find in the box that appears at the top of your screen. You may need to ask your friend what their display name is (as it may not be their first or last name) in order to find them. Learn where a person can see or change their own display name in the Settings FAQ.
As you type it will search automatically (it may take a few seconds) and if a match comes up you can select the person to see what is on their Fit Profile page. This page shows the information which they want to share about themselves. It may include their stream and their accomplishments.
If their Fit Profile is set to private you will see very little information.
If their Fit Profile is set to be public you can see the information about them that is allowed by their Privacy settings. You also may be allowed to follow or message them depending on their settings. Learn more about Privacy settings in the Settings FAQ.
To follow a friend:
Connecting and sharing information with your friends within the app becomes easy when you select to follow them.
On the Community screen select the search “magnifying glass” icon in the upper right corner of your screen.
Search to find your friend and then select them to go to their Fit Profile page. If they allow followers you will see a “+ FOLLOW” option right below their name.
Once you have selected to follow them, depending on their Privacy settings, you may be able to communicate and share more with them within the app.
To message someone from their Fit Profile:
Depending on the person’s Privacy settings, you may be able to message others with the RAC app by searching to find them and going to their Fit Profile page (see “To find your friends” section above).
If it is offered, on iPhone or iPad select the “pencil” icon, on Android devices select the “message balloon” icon.
To message a friend you are following (a short cut):
For iPhone and iPad:
On the Community screen, select “Write a post”.
Select the drop down indicator near the top of the screen and select to “Post to a friend”.
Your friend will be in the list shown if they allow messages.
Select their display name and then write your note.
To send your message select the “check mark” icon in the upper right of the screen.
For Android devices:
On the Community screen, select “Write a post”.
Select the drop down indicator near the top of the screen and select to “Motivate a friend” .
Your friend will be in the list shown if they allow messages.
Select their display name and then write your note.
To send your message select the “arrowhead” icon at the top of the screen.
YOUR STREAM:
Your stream shows what you have been doing within the RAC app. The more you use the app the more you will see information in your stream about your activities including accomplishments, messages, and group postings. You can even use your stream as a way to blog about your experiences by posting messages and pictures to your stream.
To post to your stream:
For iPhone and iPad:
On the Community screen, select “Write a post”.
At the top of the screen select “Post on my Timeline“. You can type in your post and even add a picture.
Select the “check mark” icon to make the post to your stream.
For Android devices:
On the Community screen, select “Write a post”.
At the top of the screen select “My stream“. You can type in your post and even add a picture.
Select the “arrowhead” icon to make the post to your stream.
Settings – How can I change the settings in my RAC app?
Settings are found under “Me” icon in the bottom dashboard tray of icons. Select this icon and then the “gear” icon at the top right of the screen to see the Settings screen.
SETTINGS SCREEN
The goal here is to highlight some settings. Both types of devices offer mainly the same settings. On an Android Device select “Profile” to see the Personal Information & Privacy section, and select “Notifications” to see the Notifications & Reminders section.
Personal Information & Privacy section – Lets you adjust the following:
Username – This is your Display Name.
Email – This is your contact email if you are receiving emails from the app. Changing it does not change your sign in email.
Basic personal information.
Units of measure.
Privacy Settings:Go to the Privacy Settings heading below for help in setting these.
Notifications & Reminders – Lets you select if you will get push notifications from the RAC app.
Enable Notifications (iPhone or iPad) or Notifications (Android devices) – This allows you to turn all push notifications off at once. If left on, you can then choose when you want to receive push notifications for specific occurrences.
Vibrate (Android devices)– This will allow you to select whether you want your device to vibrate with a new push notification.
Note: The “Event booking or cancellation” option is not tied into our club computer sign up software so it will not notify you if you are signed up for a club event.
Reminders – This will allow you to select if you want a push notification reminder about your next workout (all devices) or a break reminder (iPhone and iPad). You can select when you will receive the notification.
Rest Periods – Allows you to set the rest periods between sets and exercises.
Tooltips – Allows you to turn off the tips which appear within the main RAC app.
Audio – Allows you to turn off or on sounds heard when playing a workout.
Sync – Syncs your RAC app with the RAC app website.
Log out – Logs you out of the RAC app.
PRIVACY SETTINGS:
To find the Privacy settings, on the Settings Screen:
(iPhone and iPad) Select “Manage Privacy Settings”.
(Android devices) Select “Profile” and then “Manage Privacy Settings”at the bottom of your screen.
You will now see the Privacy settings. These settings mostly define with whom you will share your app information. A few important notes:
These can be very confusing, so we have provided a clear question for each setting that describes what you are setting.
The RAC app website has different names for several of the settings. These names are in parenthesis. They adjust the same things.
Select on the name of the setting to see the options.
“Followers of followers” would be the followers of people who follow you, so kind of friends of friends.
“Anyone in my community” means anyone in our club.
Visible Name
What is used for your visible name that shows for others on your Fit Profile, posts and stream?
Fit Profile
Who can see your Fit Profile which shows your progress, activities, challenges, awards and posts?
Can post on my Fit Profile and follow me (Can send you messages and buddy invites)
Who can follow you and post messages on your Fit Profile?
Progress Pictures
Who can see your progress pictures? Progress pictures can be uploaded to and viewed on your Fit Profile on the RAC app website only.
Nutrition updates and awards (Nutrition)
Who can see updates on your stream about the Nutrition plan you set and the Nutrition awards that you got rewarded?
Progress achievements and challenges (Progress graphs and challenges)
Who can see updates on your stream about the progress you made, challenges you participate in and awards you received with those challenges?
Followers (Buddies)
Who can follow you?
Activities (Exercises)
Who can see updates on your stream about the activities that you logged in your activity calendar?
Leaderboard
Do you want your entry to be shown on the Club Leaderboard? The Club Leaderboard is only seen through the RAC app website. It shows how you’re doing compared to others with regards to Fitness Points, kcal burned and minutes spent working out. The “Visible for everyone” option allows people at clubs other than ours to see your leaderboard entry.
How can I set my profile picture?
You can set your profile picture by selecting the “Me” icon in the dashboard tray and then selecting the “pencil” icon in the upper right of the screen. Then select top profile banner section. You can then select to “Take picture” or chose one from a gallery on your device.
How can I, or someone else on my membership, be invited to use the RAC app?
How to be invited:
If you are an existing member and you would like to receive the invitation to get started, please email RACapp@racmn.com. Provide first name, last name, and a unique email address.
An email invitation will then be sent once your email is processed. The invitation includes a link to create a RAC app account and download the app.
You can provide multiple people’s information on your membership within one email if you want others on your membership to be set up.
Who has received an invitation for the RAC app:
When we first introduced the app, an email invitation was sent to all active club members 13 and older that had a unique email address set up on their RAC club account.
As new members join the club they are sent an email invitation for each individual 13 and older with a unique email address set up on their club account.
How can I download the RAC app on a new device?
When you were first invited to the RAC app with an email, you were provided a link to set up your account and then download the app. If you have your account set up, you can download the app on another device and sign in.
IPHONE AND IPAD DOWNLOAD DIRECTIONS:
Find the RAC app in the App Store. Search for Rochester Athletic Club (MN).
Select the “cloud” icon to download. Once it has installed, you will see an option to “OPEN”.
Select “OPEN”.
Select to “Allow” notifications.
Enter your RAC app login that you set up when you created your RAC app account. Select “Log in”.
Select “Continue”.
Enter your birth date, height and weight. Select “Done”.
You are now on the RAC app home screen.
ANDROID PHONE AND TABLET DOWNLOAD DIRECTIONS:
Find the RAC app in the Google Play Store. Search for Rochester Athletic Club (MN). Click here for a direct link.
You will see several similar options to download. Select the one that ends in “(MN)”.
Select to “INSTALL”. Once it has installed, you will see an option to “OPEN”.
Select to “OPEN”.
Enter your RAC app login that you set up when you created your RAC app account. Select “Log in”.
Select the right arrow button to continue.
Select individual lines to enter your birth date, height and weight. You can select “Next” in the keypad to move from entry to entry. When you have entered all, select “Done” in the keypad. Select the “check mark” icon to go to the next screen.
You are now on the RAC app home screen.
How do I reset my password?
On the RAC app sign on screen there is a “Forgot your password” option that will allow you to reset your password. You must know which email address you used when you set up your RAC app account. If you do not know the email you used, please contact the RAC App Administrator for assistance.
Can guests access the RAC app?
Guests are not able to access the RAC app. Guests are encouraged to use the racmn.com website if they wish to access the Group Fitness Schedules and other information about the club.
Are Fitness points within the RAC app related to RAC Perks points?
Fitness points are not directly tied into our RAC Perks points system. However, we may have contests based on Fitness points which could be rewarded with RAC Perks points or prizes in general. Fitness points are based on your activity and participation within the RAC app.
Website – What can I do through the RAC app website?
There is a RAC app website where you can use many of the tools that are available through the app. Sign in using your regular RAC app login information. This website is especially helpful if you prefer to have a desktop computer view and want to use a full size keyboard for entering your workouts or nutrition plans.
Once you sign in to the RAC app website, initially you are brought to the home screen where you will see a Top Black Bar across your screen and just below it a white bar that has a number of Tabs (headings).
TAB OPTIONS:
These tab options are a little bit like the online version of your personal dashboard (especially when you add in clicking on your first name in the top black bar to see your profile page).
Start – Shows any current RAC Club Notifications.
If you click on the sliding pictures you will be taken to the destination listed.
You can return to this Start tab at any time by clicking on the RAC logo directly above it in the top black bar.
The Members list at the bottom right shows members that are online with the green triangle in the top left corner. All Rochester Athletic Club members are automatically made “PRO” members. Although members are listed here, there is no option to search. See the Members tab below for help searching.
Leaderboard – Shows the current leaders in Fitness points for the club. Totals are accumulated for each month and then set to back to zero at the beginning of the next month. You can also view the “Overall” point total. This leaderboard can only be viewed through the RAC app website.
Challenges – Allows you to search and filter for Challenges, and will initially show club challenges if any are active. You can also add a personal challenge by selecting “Add challenge”. You can only create a personal challenge through the RAC app website (not available in RAC app).
Groups – See the club groups. Select a group to learn more about it, or to see recent posts if you have joined the group.
Members – Search for your friends if you know their display name. This name sometimes is not related to their first or last name so you may need to ask them.
Search on at least 3 characters of their display name. (Note: if you did just search on 3 characters, it would return a result if those 3 characters are found anywhere in the display name.)
You will not need to set the Country to find members at the club.
Once you have found the member you can select them to see their profile page. A person can choose what is available to be seen on their profile page in their settings.
Contact – shows the Rochester Athletic Club contact information. Also shows our open hours and members. It is easier to search for members using the Members tab (see above).
Support – Offers some additional information resources, some of which are not tailored directly to a member using our app.
TOP BLACK BAR OPTIONS:
RAC Logo – Takes you back to the Start tab.
“9 Squares” icon – This shows your “menu” of apps available through the desktop. You can select these apps much like you can select the corresponding home screen tiles on the RAC app. Note that Body Metrics corresponds to the Progress tile function on the RAC app home screen.
“Your first name” – Your name shows your Fit Profile page. It will bring up your personal view of your page with all of your information on it. You can select what parts of the page others can see by adjusting your settings (see below and in the Settings FAQ).
“Drop down arrow” icon – This will allow you to view information about your account. You can select:
Inbox – to see the private messages you have received. Once there you can also select to create a New message or to view your Sent messages.
Account Settings – (see the next section to learn about Account Settings)
ACCOUNT SETTINGS:
You can get to the account settings by selecting the “drop down arrow” icon in the top black bar. The account settings are similar to what you can set through the mobile app. There are a few added options and slight differences in terminology that can be confusing, but it is often changing the same information and settings as the app. A couple of quick notes:
Email settings – Allows you to adjust when you receive emails from the RAC app. The RAC app website is the only place you can adjust these email settings. They do not affect Push Notification settings. Those are set in the RAC App (see Settings FAQ).
Email and password – Changing your email address will change where emails coming from the app are sent, but will not change the email you use to sign in to the app.
Privacy – These Privacy settings mostly define with whom you will share your app information. Go to the Settings FAQ to learn what the settings mean.
Connections – Allows you set up your Fitbit to feed information into the RAC app.
Join the RAC and book a personal training or small group session with your favorite trainer!