If you are reading this you probably currently have, have dealt with in the past, or know of someone close to you who has experienced chronic low back pain.
In fact, it is estimated that up to 80% of the population will experience low back pain at some point in their lifetime (Rubin, 2007). If you have low back pain you may have even gone as far to get checked out by a doctor, only to find that you have no structural damage and are left with the advice to strengthen your core and stretch more. Despite doing this you may have had no relief from your symptoms or by chance they have become even worse.
Perhaps the problem actually does not lie within your low back, but in your hips.
The human body is like an amazingly intricate machine and is constantly performing tasks subconsciously and consciously – no matter what the cost. If one area is not capable of performing the demands required of it, the body will compensate and move the load somewhere else. For many people, the hips are both tight and weak and because of this the body compensates hundreds or even thousands times a day by having the low back do the extra work. Even if you are one of the lucky ones who have avoided low back pain to this point, chances are there is still some amount of dysfunction that can be addressed in your hips to help keep you injury free.
To help your low back we must first work on the mobility of your hips, followed by the stability and proper function of them. A hip is made up of a ball and socket joint. This type of joint requires muscles on all sides of it to hold it in place, which opens up the possibility for a lot of tightness and dysfunction. While there are many options to choose from to address this, I am going to highlight a few stretches and exercises, most of which require only body weight, that I have seen make the biggest difference for my clients.
Hip Flexor Stretch – The Kneeling Lunge
First up is a stretch for the hip flexor, which is located on the front side of your hip, just below your belt line, and connects from the top of your thigh, runs through your body and to your low back. It is involved raising your leg and bending at the waist. Many people spend most of their day in a seated position. This results in the hip flexor being in its shortest position causing it to tighten over time. We start by working to mobilize the hip flexor by stretching it.
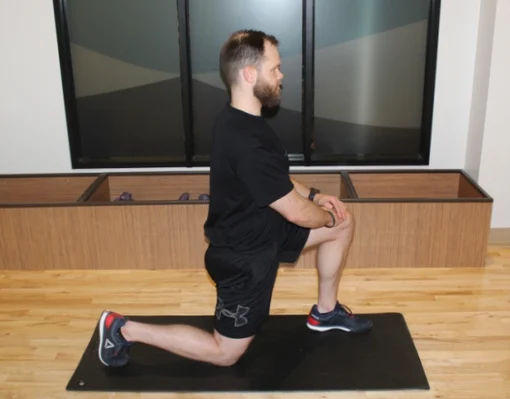
- Start out in a kneeling lunge position on the ground.
- Begin to initiate the stretch by tucking your tailbone underneath your body. You should feel your core and glutes engaged at this point and a stretch in the front of your hip.
- To feel a more intense stretch you may transition forward an inch or two.
- Hold this stretch, keeping your core and glutes firing for at least 30 seconds, then switch sides.
- Make sure not to overextend in your low back causing it to over arch during this stretch.
A common mistake that I see people make on a regular basis is to not tuck the tailbone and instead take a large step forward and then move forward in an exaggerated fashion in order to feel the stretch of the hip flexor. This is a flaw for two reasons. First of all, it does not engage the muscles around it to help your body learn what proper form they should be in. Secondly, it takes the top of the femur and smashes it into the hip flexor.
Piriformis Stretch – Pigeon Pose
Another hip muscle I’ve found to cause problems for the low back is the piriformis. The piriformis muscle is located on the upper area of your butt, just below your belt line. This one once again tends to be worsened by sitting on it all day. Not only can a tight piriformis muscle cause problems for your low back but it can also be the cause of sciatic pain in the leg.
There are many different stretches for the piriformis from standing using a table, to a seated position, to laying on the floor. I have chosen to cover a floor stretch called pigeon pose in yoga. If you are not able to get to the floor or perform this stretch I recommend googling “piriformis stretch progressions” and following along with the directions.
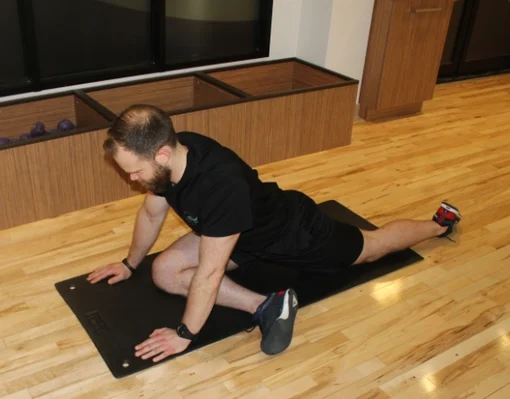
- To perform the pigeon stretch, start on the ground in a plank position.
- Begin by bringing one of your knees forward towards that same side elbow, follow this by bringing your ankle underneath your body towards your opposite wrist – causing your shin to be underneath your torso.
- Begin to lower your body towards the ground causing both legs to come in contact with the ground. You should begin to feel a stretch in your piriformis.
- The lower you bring your hips to the ground, the more of a stretch you should feel.
- You can also increase the stretch by lowering your chest towards the ground.
- Make sure not to twist towards the ground as this will remove the stretch.
If you feel a pain in your front knee during this stretch decrease the angle of your knee by bringing your front ankle further back underneath you. Hold this stretch for at least 30 seconds, then work to push your front knee into the ground for 8-10 seconds. Although your body won’t move, you should feel your glute muscles begin to fire. Switch sides and perform on the opposite side.
Hip Rotators – The 90/90 Position
This is my favorite lesser known exercise/stretch to address the hips. It’s a fantastic mix of mobility and stability. The 90/90 position addresses the internal and external rotation of the hips and both of these movements can help with improving squatting. Although there are many different options that can be done from this position, I will highlight the two that I like to start my clients out with.
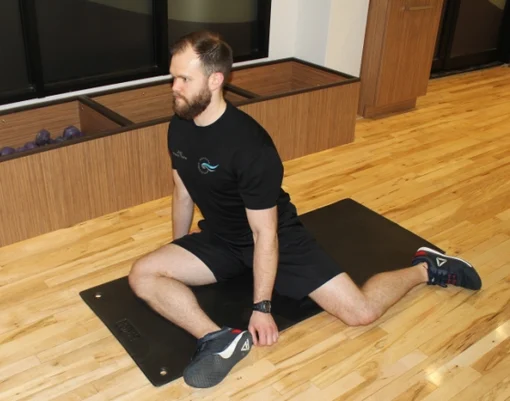
- Starting seated on the floor make your legs in to all 90 degree or right angles. There should be a 90 degree angle at both of your ankles, knees and your hips, resulting in one leg begin in front of you and one to your side/behind you. This is the 90/90 position, chances are you may even feel a stretch in this position already, and if so go ahead and hang out in this position for 30 seconds.
- Next initiate the movement by pressing the ankles and knees of both of your legs into the ground. This will engage your external rotators of your front leg and your internal rotators of the back leg. Continue pressing for 8-10 seconds.
- Next we’ll work to rotate to the other side. From the 90/90 position, with your hands off the ground, begin by pressing with the heel of your front foot and pulling with the toe of your back leg and begin to rotate your knees up and to the other side. If you’ve done this correctly you should end up in the 90/90 position (or hopefully something like it) on the other side.
- Perform the same movement on this side as you did previously, working to press both knees and ankles into the ground for 8-10 seconds, then rotate back to your first side.
- Perform three rotations to each side with the 8-10 second engagement each time.
Glute Strengthening – The Clamshell
The glutes are the largest muscle group in the human body and the most powerful – at least they are supposed to be. Unfortunately for most people who spend their day sitting they spend all that time with all their weight squashing their glutes and not using them, thus resulting in dormant glutes that don’t function properly.
My favorite exercise to engage the glutes is the clamshell. For this exercise you will need a small resistance band. You may have some of these at home, otherwise they are available at the RAC fitness desk. While monster walks or side steps with a band will also work the glutes, I’ve found that people sometimes struggle to target the glutes with those exercises. Since the glutes are used to being dormant, the surrounding lateral hip muscles and even the hip flexor will sometimes be unintentionally recruited to execute the movement.
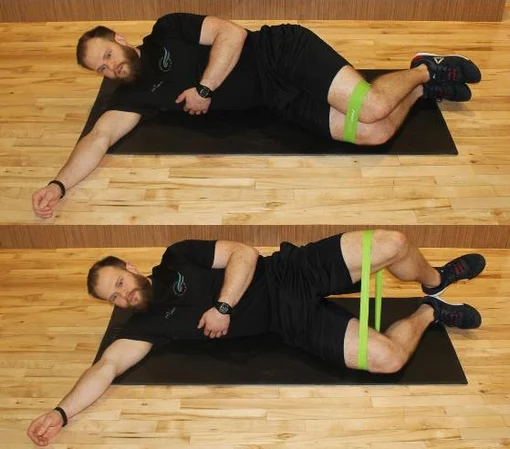
- To perform the clamshell start by lying on your side on the ground, with the band around your legs, just above your knees. With your legs stacked on top of one another bring your legs to about 90 degrees and your knees slightly in front of the rest of your body.
- Start the movement by squeezing your butt together, this should already start to drive your knees apart a little bit.
- Keeping your heels touching, raise your knee up into the air, with your other remaining on the ground. You should really feel your glutes firing at this point.
- Hold this position for 5-6 seconds then lower your leg back to the ground in a controlled manner.
- Perform 5 each side before switching sides.
Hinge Movement – The Bridge
We use a hinge motion in our daily activities whenever we are sitting down, squatting, or bending over to pick something up. Many people do these activities by bending at the lower back and placing stress upon it. A proper hinge movement is initiated by sticking your butt backwards, maintaining a neutral spine, and placing the load on your hips as you lower your torso toward the ground.
There are many great functional hinging exercises such as the deadlift, Romanian deadlift, and kettlebell swing. However due to the complexity of these exercises I encourage you to speak to a personal trainer before you attempt them. I would suggest the bridge exercise as a great place to start on your own. While many are familiar with this exercise, and some may even consider it easy, it is one of the best building blocks for hip strength and a great foundational exercise for hinging. To this day I regularly keep the bridge in my warm up routine.
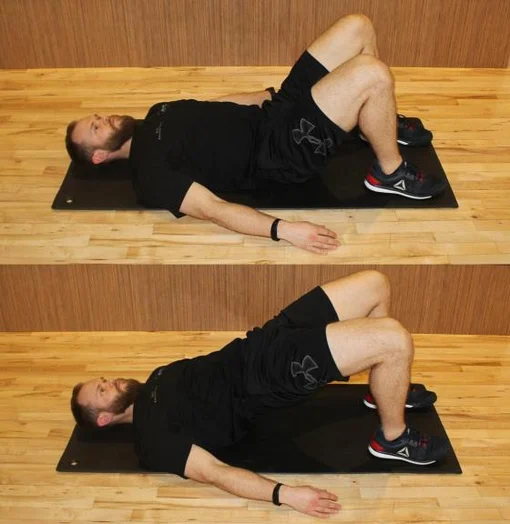
- To start the exercise begin lying on your back, knees bent to about 90 degrees and hip width apart, feet flat on the floor.
- Initiate the movement by pressing the low back flat into the ground, this should begin to engage your core and glutes.
- From here squeeze your butt together and begin to raise your butt off the ground causing your knees to drive a few inches further apart.
- At the top of the movement continue to maintain the squeeze in your butt, hold for 5-6 seconds then lower down in a controlled manner.
- Make sure to recheck that your low back is in contact with the ground before initiating the next repetition.
- Do 8-10 repetitions.
How to work these stretches and exercises into your routine:
The next time you’re in the gym try adding these to your warm-up. You could even go a step further and begin adding them into a daily routine, multiple times a day if you can. The more frequently you address the problem, the quicker you will be to making it subside. If you have any questions, please ask Fitness Floor staff or a Personal Trainer. They can aid in applying these ideas to your workout and help you to gain the benefits of attending to the health of your hips and low back.
Source:
Rubin Dl. Epidemiology and Risk Factors for Spine Pain. Neurol Clin. 2007; May;25(2):353-71.